Pressure - Temperature
Relationship in Gases
Gases are made up of molecules that are in constant motion and exert pressure when they collide with the walls of their container. The velocity and the number of collisions of these molecules are affected when the temperature of the gas increases or decreases. In this experiment, you will study the relationship between the temperature of a gas sample and the pressure it exerts. Using the apparatus shown in Figure 1, you will place an Erlenmeyer flask containing an air sample in water baths of varying temperature. Pressure will be monitored with a Pressure Sensor and temperature will be monitored using a Temperature Probe. The volume of the gas sample and the number of molecules it contains will be kept constant. Pressure and temperature data pairs will be collected during the experiment and then analyzed. From the data and graph, you will determine what kind of mathematical relationship exists between the pressure and absolute temperature of a confined gas. You may also do the extension exercise and use your data to find a value for absolute zero on the Celsius temperature scale.
OBJECTIVES
In this experiment, you will
• Study the relationship between the temperature of a gas sample and the pressure it exerts.
• Determine from the data and graph, the mathematical relationship between pressure and absolute temperature of a confined gas.
• Find a value for absolute zero on the Celsius temperature scale.
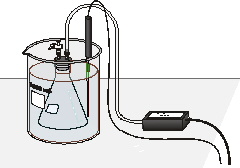
Figure 1
MATERIALS
LabQuest |
plastic tubing with two connectors |
LabQuest App |
125 mL Erlenmeyer flask |
Vernier Gas Pressure Sensor |
rubber stopper assembly |
Temperature Probe |
ring stand and utility clamp |
ice |
four 1 liter beakers |
hot plate |
glove or cloth |
PROCEDURE
1. Obtain and wear goggles.
2. Prepare a boiling-water bath. Put about 800 mL of hot tap water into a l L beaker and place it on a hot plate. Turn the hot plate to a high setting.
3. Prepare an ice-water bath. Put about 700 mL of cold tap water into a second 1 L beaker and add ice.
4. Put about 800 mL of room-temperature water into a third 1 L beaker.
5. Put about 800 mL of hot tap water into a fourth 1 L beaker.
6. Prepare the Temperature Probe and Gas Pressure Sensor for data collection.
a. Connect the Gas Pressure Sensor to Channel 1 of LabQuest and the Temperature Probe to Channel 2. Choose New from the File menu. If you have older sensors that do not auto-ID, manually set up the sensors.
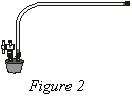
b. Obtain a rubber-stopper assembly with a piece of heavy-wall plastic tubing connected to one of its two valves. Attach the connector at the free end of the plastic tubing to the open stem of the Gas Pressure Sensor with a clockwise turn. Leave its two-way valve on the rubber stopper open (lined up with the valve stem as shown in Figure 2) until Step 6d.
c. Insert the rubber-stopper assembly into a 125 mL Erlenmeyer flask. Important: Twist the stopper into the neck of the flask to ensure a tight fit.
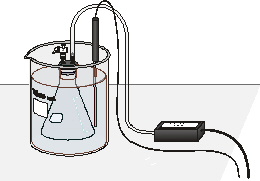
Figure 3
d. Close the 2-way valve above the rubber stopper—do this by turning the valve handle so it is perpendicular with the valve stem itself (as shown in Figure 3). The air sample to be studied is now confined in the flask.
7. On the Meter screen, tap Mode. Change the mode to Selected Events. Select OK.
8. Change the graph settings to display a graph of pressure vs. temperature.
a. Tap Graph.
b. Choose Show Graph ►Graph 1 from the Graph menu.
c. Tap the x-axis label and choose Temperature.
9. Start data collection. Pressure readings (in kPa) and temperature readings (in °C) and are displayed on the screen.
10. Collect pressure vs. temperature data for your gas sample.
a. Place the flask into the ice-water bath. Make sure the entire flask is covered (see Figure 3).
b. Place the Temperature Probe into the ice-water bath.
c. When the temperature and pressure readings have both stabilized, tap Keep to store the temperature and pressure readings.
11. Repeat Step 10 using the room-temperature bath.
12. Repeat Step 10 using the hot-water bath.
13. Use a ring stand and utility clamp to suspend the Temperature Probe in the boiling-water bath. CAUTION: Do not burn yourself or the probe wires with the hot plate. To keep from burning your hand, hold the tubing of the flask using a glove or a cloth. After the Temperature Probe has been in the boiling water for a few seconds, place the flask into the boiling-water bath and repeat Step 10. Stop data collection and remove the flask and the Temperature Probe.
14. Examine the data points along the displayed graph of pressure vs. temperature (°C). To examine the data pairs on the displayed graph, tap any data point. As you tap each data point, the temperature and pressure values are displayed to the right of the graph. Record the data pairs in your data table.
15. In order to determine if the relationship between pressure and temperature is direct or inverse, you must use an absolute temperature scale; that is, a temperature scale whose 0° point corresponds to absolute zero. You will use the Kelvin absolute temperature scale. Instead of manually adding 273° to each of the Celsius temperatures to obtain Kelvin values, you will create a new column for Kelvin temperature.
a. Tap the Table tab to display the data table.
b. Choose New Calculated Column from the Table menu.
c. Enter the Column Name (Kelvin Temp) and Units (K).
d. Select the equation, X+A. Use Temperature as the Column for X, and enter 273 as the value for A. Select OK to display the graph of pressure vs. Kelvin temperature.
e. Tap any data point to record the Kelvin temperature values (displayed to the right of the graph) in your data table.
16. Follow this procedure to calculate regression statistics and to plot a best-fit regression line on your graph of pressure vs. Kelvin temperature:
a. Choose Curve Fit from the Analyze menu.
b. Select Linear as the Fit Equation. The linear-regression statistics for these two lists are displayed for the equation in the form:
y = mx + b
where x is temperature (K), y is pressure, m is a proportionality constant, and b is the y-intercept.
c. Select OK.
17. (optional) Print a graph pressure vs. Kelvin temperature (with a regression line displayed).
PROCESSING THE DATA
1. In order to perform this experiment, what two experimental factors were kept constant?
2. Based on the data and graph that you obtained for this experiment, express in words the relationship between gas pressure and temperature.
3. Explain this relationship using the concepts of molecular velocity and collisions of molecules.
4. Write an equation to express the relationship between pressure and temperature (K). Use the symbols P, T, and k.
5. One way to determine if a relationship is inverse or direct is to find a proportionality constant, k, from the data. If this relationship is direct, k = P/T. If it is inverse, k = P•T. Based on your answer to Question 4, choose one of these formulas and calculate k for the four ordered pairs in your data table (divide or multiply the P and T values). Show the answer in the fourth column of the Data and Calculations table. How “constant” were your values?
6. According to this experiment, what should happen to the pressure of a gas if the Kelvin temperature is doubled? Check this assumption by finding the pressure at –73°C (200 K) and at 127°C (400 K) on your graph of pressure versus temperature. How do these two pressure values compare?
DATA AND CALCULATIONS
Pressure |
Temperature |
Temperature |
Constant, k |
|
|
|
|
|
|
|
|
|
|
|
|
|
|
|
|
EXTENSION
The data that you have collected can also be used to determine the value for absolute zero on the Celsius temperature scale. Instead of plotting pressure versus Kelvin temperature like we did above, this time you will plot Celsius temperature on the y-axis and pressure on the x-axis. Since absolute zero is the temperature at which the pressure theoretically becomes equal to zero, the temperature where the regression line (the extension of the temperature-pressure curve) intercepts the y-axis should be the Celsius temperature value for absolute zero. You can use the data you collected in this experiment to determine a value for absolute zero.
a. On the graph, change the x-axis to Pressure.
b. Change the y-axis to Temperature (°C). A graph of temperature (°C) vs. pressure is now displayed.
c. Choose Curve Fit from the Analyze menu.
d. Select Linear for the Fit Equation. The linear-regression statistics for these two lists are displayed for the equation in the form:
y = mx + b
where x is temperature (°C), y is pressure, m is a proportionality constant, and b is the y-intercept.
e. Select OK.
f. Choose Graph Options from the Graph menu. Enter 0 as the left-most value on the x-axis (Pressure). Then enter –300 as the bottom-most value on the y-axis (Temperature). Select OK.
g. Choose Interpolate from the Analyze menu. The temperature and pressure coordinate values of the regression line are displayed to the right of the graph. Tap along the regression line to a pressure value that is equal to 0 kPa. Note: You can also use the ◄ button on LabQuest to help move the cursor to 0 kPa. The temperature (in °C) at this pressure is the absolute-zero value for your data.
h. (optional) Print a graph of temperature vs. pressure, with a regression line and extrapolated temperature value displayed.