 Carbonic acid occurs when carbon dioxide gas dissolves
in rain droplets of unpolluted air:
Carbonic acid occurs when carbon dioxide gas dissolves
in rain droplets of unpolluted air:Acid Rain
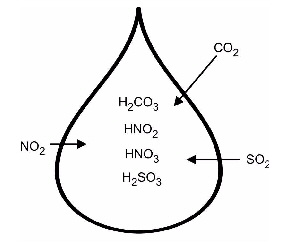
In this experiment, you will observe the formation of four acids that occur in acid rain:
• carbonic acid, H2CO3
• nitrous acid, HNO2
• nitric acid, HNO3
• sulfurous acid, H2SO3
Carbonic acid occurs when carbon dioxide gas dissolves
in rain droplets of unpolluted air:
(1) CO2(g) + H2O(l)→ H2CO3(aq)
Nitrous acid and nitric acid result from a common air pollutant, nitrogen dioxide (NO2). Most nitrogen dioxide in our atmosphere is produced from automobile exhaust. Nitrogen dioxide gas dissolves in rain drops and forms nitrous and nitric acid:
(2) 2 NO2(g) + H2O(l) → HNO2(aq) + HNO3(aq)
Sulfurous acid is produced from another air pollutant, sulfur dioxide (SO2). Most sulfur dioxide gas in the atmosphere results from burning coal containing sulfur impurities. Sulfur dioxide dissolves in rain drops and forms sulfurous acid:
(3) SO2(g) + H2O(l) → H2SO3(aq)
In the procedure outlined below, you will first produce these three gases. You will then bubble the gases through water, producing the acids found in acid rain. The acidity of the water will be monitored with a pH Sensor.
OBJECTIVES
In this experiment, you will
• Generate three gaseous oxides, CO2, SO2, and NO2.
• Simulate the formation of acid rain by bubbling each of the three gases into water and producing three acidic solutions.
• Measure the pH of the three resulting acidic solutions to compare their relative strengths.
MATERIALS
LabQuest |
solid NaNO2 |
LabQuest App |
solid NaHCO3 |
Vernier pH Sensor |
solid NaHSO3 |
wash bottle with distilled water |
1 Beral pipet with 1.0 M HCl |
100 mL beaker |
3 Beral pipets with a 2 cm stem |
20 X 150 mm test tube |
3 Beral pipets with a 15 cm stem |
ring stand |
tap water |
utility clamp |
|
PROCEDURE
1. Obtain and wear goggles.
2. Obtain three short-stem and three long-stem Beral pipets. Label the short-stem pipets with the formula of the solid they will contain: “NaHCO3”, “NaNO2”, and “NaHSO3”. Label the long-stem pipets with the formula of the gas they will contain: “CO2”, “NO2” and “SO2”. You can use a 100 mL beaker to support the pipets.
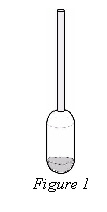
3. Obtain a beaker containing solid NaHCO3. Squeeze the bulb of the pipet labeled “NaHCO3” to expel the air, and place the open end of the pipet into the solid NaHCO3. When you release the bulb, solid NaHCO3 will be drawn up into the pipet. Continue to draw solid into the pipet until there is enough to fill the curved end of the bulb, as shown in Figure 1.
4. Repeat the Step 3 procedure to add solid NaNO2 and NaHSO3 to the other two Beral pipets. CAUTION: Avoid inhaling dust from these solids.
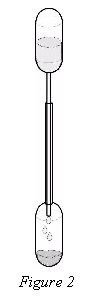
5. Obtain a Beral pipet with 1.0 M HCl from your teacher. CAUTION: HCl is a strong acid. Gently hold the pipet with the stem pointing up, so that HCl drops do not escape. Insert the narrow stem of the HCl pipet into the larger opening of the pipet containing the solid NaHCO3, as shown in Figure 2. Gently squeeze the HCl pipet to add about 20 drops of HCl solution to the solid NaHCO3. When finished, remove the HCl pipet. Gently swirl the pipet that contains NaHCO3 and HCl. Carbon dioxide, CO2, is generated in this pipet. Place it in the 100 mL beaker, with the stem up, to prevent spillage.
6. Repeat the procedure in Step 5 by adding HCl to the pipet containing solid NaHSO3. Sulfur dioxide, SO2, is generated in this pipet.
7. Repeat the procedure in Step 5 by adding HCl to the pipet containing solid NaNO2. Nitrogen dioxide, NO2, is generated in this pipet. When you have finished this step, return the HCl pipet to your teacher. Leave the three gas-generating pipets in the 100 mL beaker until Step 10.
8. Connect the pH Sensor to LabQuest and choose New from the File menu. If you have an older sensor that does not auto-ID, manually set up the sensor.
9. Use a utility clamp to attach a 20 X 150 mm test tube to the ring stand. Add about 4 mL of tap water to the test tube. Remove the pH Sensor from the pH storage solution, rinse it off with distilled water, and place it into the tap water in the test tube.
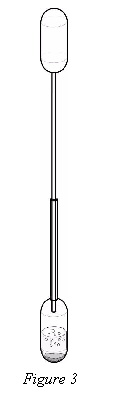
10. Squeeze all of the air from the bulb of the long-stem pipet labeled “CO2”. Keep the bulb completely collapsed and insert the long stem of the pipet down into the gas-generating pipet labeled “NaHCO3”, as shown in Figure 3. Be sure the tip of the long-stem pipet remains above the liquid in the gas-generating pipet. Release the pressure on the bulb so that it draws gas up into it. Store the long-stem pipet and the gas-generating pipet in the 100 mL beaker.
11. Repeat the procedure in Step 10 using the pipets labeled “NaNO2” and “NO2”.
12. Repeat the procedure in Step 10 using the pipets labeled “NaHSO3” and “SO2”.
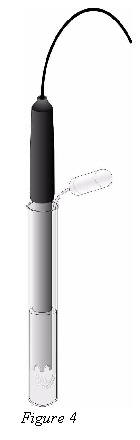
13. Insert the long-stem pipet labeled “CO2” into the test tube, alongside the pH Sensor, so that its tip extends into the water to the bottom of the test tube, as shown in Figure 4.
14. Start data collection. After 15 seconds have elapsed, gently squeeze the bulb of the pipet so that bubbles of CO2 slowly bubble up through the solution. Use both hands to squeeze all of the gas from the bulb. Data collection will end after 2 minutes.
15. When data collection is complete after 2 minutes, a graph of pH vs. time will be displayed. As you tap each data point (or use the ► or ◄ keys on LabQuest), the pH and time values are displayed. Determine the initial pH (before CO2 was added) and record this value. Then determine the final pH value (after CO2 was added and pH stabilized) and record this value.
16. Store the data from the first run by tapping the File Cabinet icon.
17. Rinse the pH Sensor thoroughly with distilled water and return it to the pH storage solution. Discard the contents of the test tube as directed by your teacher. Rinse the test tube thoroughly with tap water. Add 4 mL of tap water to the test tube. Place the pH Sensor in the test tube. Tap Meter to check to see that the input display shows a pH value that is about the same as the previous initial pH. If not, rinse the test tube again.
18. Repeat the data collection using Steps 14–17 for NO2.
19. Repeat the data collection using Steps 14–15 for SO2. Important: Do not store this run as you did in the first two runs—proceed directly to Step 20 after you complete Step 15.
20. When you are finished, rinse the pH Sensor with distilled water and return it to the pH storage solution. Return the six pipets to the location designated by your teacher.
21. To view a graph of pH vs. time showing all three data runs, tap Run 3, and select All Runs. All three runs will now be displayed on the same graph.
22. (optional) Print a copy of the graph displayed in Step 21. Label each run as CO2, NO2, or SO2.
Processing the data
1. For each of the three gases, calculate the change in pH (∆pH), by subtracting the final pH from the initial pH. Record these values in the Data and Calculations table.
2. In this experiment, which gas caused the smallest drop in pH?
3. Which gas (or gases) caused the largest drop in pH?
4. Coal from western states such as Montana and Wyoming is known to have a lower percentage of sulfur impurities than coal found in the eastern United States. How would burning low-sulfur coal lower the level of acidity in rainfall? Use specific information about gases and acids to answer the question.
5. High temperatures in the automobile engine cause nitrogen and oxygen gases from the air to combine to form nitrogen oxides. What two acids in acid rain result from the nitrogen oxides in automobile exhaust?
6. Which gas and resulting acid in this experiment would cause rainfall in unpolluted air to have a pH value less than 7 (sometimes as low as 5.6)?
7. Why would acidity levels usually be lower (pH higher) in actual rainfall than the acidity levels you observed in this experiment? Rainfall in the United States generally has a pH between 4.5 and 6.0.
DATA TABLE
Gas |
Initial pH |
Final pH |
Change in pH (∆pH) |
CO2 |
|
|
|
NO2 |
|
|
|
SO2 |
|
|
|