|
NMSBVI Presents...
DIMC
(Drive-In Media Center)
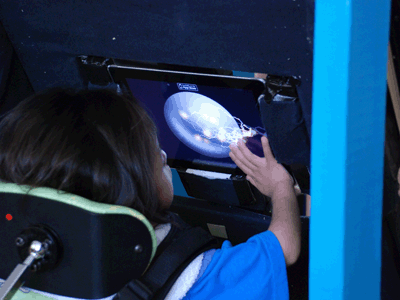
The DIMC (Drive In Media Center; pronounced dim-see) was designed to
allow students with positional issues, some of whom have the greatest
freedom of arm movement while supported in a wheelchair or stander, to
access a variety of media options. Computer screens, for example, are
generally presented upright and perpendicular to the surface on which
they are placed. While screens can often be tilted a few degrees the
possible angles traditionally available don’t meet the needs of all
students. It became clear that the solution was to allow for a far
greater range of viewing angles. The DIMC was designed to allow a screen
to be presented at several different angles along a 90 degree arc from
perpendicular to the floor all the way to parallel to the floor.
Additionally, the DIMC was designed to allow students (in wheelchairs)
to be maneuvered relative to the screen in order to meet the visual
needs.
The pictures below show several of the many different angles various
media options can be presented to a student in a gait trainer or
wheelchair. (Angles for the ‘roof’ are created via the drilling of holes
in the frame of the DIMC on the back pillars. This particular DIMC has
20 different ‘roof’ positions available—it could be built with more roof
angles available.) The DIMC has proven to be highly adaptable in terms
of the placement of buttons and switches. The wood construction allows
for switches or mounts that hold switches to be placed in a staggering
number of positions and angles.
Media options extend beyond computer screens. An iPAD holder was built
to allow a student to access that touch screen device while in a
wheelchair. Large books and pictures can be presented through the
opening in which the computer monitor generally resides.
The DIMC is adaptable and teachers will undoubtedly find new ways of
using it which haven’t yet been considered. Of DIMCs currently in use,
the TVIs have so far used the DIMC to:
-
Position a student in a gait trainer with an iPAD slightly above and
at an angle, encouraging him to reach slightly up to reach the
device and also hold his head up;
-
Position a student in a wheelchair and attach a button to the DIMC
with which the student can access basic cause and effect software;
-
Position a student in a gait trainer/wheelchair with a computer
monitor on which is shown a DVD but with the sound activated by
switch (can’t activate the monitor or DVD itself with the switch
since computers, DVD players and monitors don’t have positive on
switches….had to dig up old wall outlet powered computer speakers
and run them through a switch latch and timer);
-
Position a student in a wheelchair with a computer monitor on which
is shown Youtube clips/clips of family gathering in order to
encourage choice making—with yes/no switches (student only has
reliable movement of the head) to answer yes/no questions as to what
the student wants to watch as well as yes/no detail/comprehension
questions about what has been watched;
-
Position a student in a wheelchair with a large book placed in the
window of the ‘roof’ to enable the student to see it on a
comfortable angle (also without tiring out the arms of the staff
member showing the student the book).
Educators: Please feel free to construct and use this
device at your discretion. However, NMSBVI assumes no liability
regarding this innovation or its use/misuse.
For additional information, please contact the inventor, Ron Later, at
rlater@nmsbvi.k12.nm.us
|
|
|
|
|
|
|
Features & Usage: |
|
 |
Shown
here:
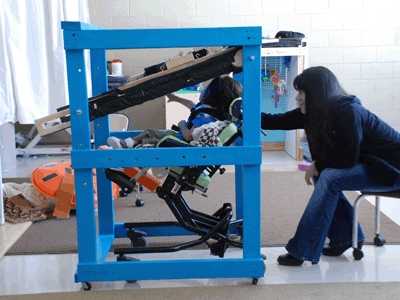
The roof is held in place by bolts. A pair of ½” thick bolts form
the pivot at the front of the DIMC—visible near the teacher’s head.
These bolts can be removed to allow the height of the roof to be
adjusted but typically stay in place. A pair of 3/8” thick bolts at
the back of the DIMC—visible where the black arm of the roof meets
the vertical frame—ensure that the roof won’t swing down and hit the
student. This is the 3rd possible angle for the roof. The
student is reaching out for an iPad. |
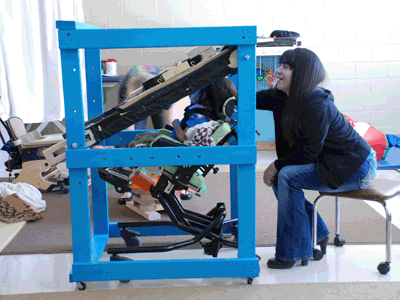 |
This is the 4th possible angle for the
roof. Note the two holes on the vertical frame above the bolt plus a
third hole where the vertical and horizontal frames meet. The DIMC
can present media parallel to the floor all the way to perpendicular
to the floor depending on student need.
|
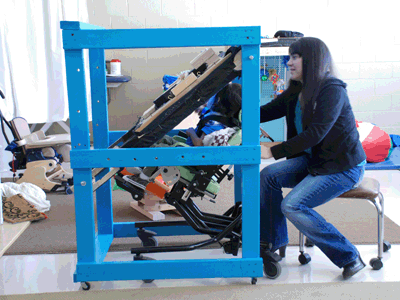 |
This is the 6th possible angle, with the
roof bolted to the vertical frame just below the horizontal frame.
The rearmost of the holes on the horizontal frame is the 5th
possible angle.
|
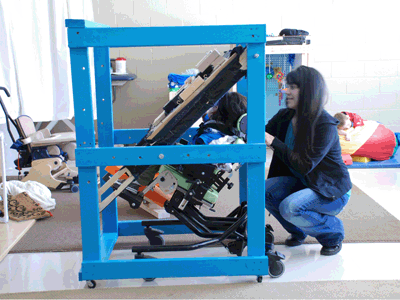 |
This is the 8th possible angle, with the
roof resting on a bolt pressed through the horizontal frame. Note
the hole in the DIMC about the 1/2” bolt (near the teacher’s head)
where the vertical frame meets the horizontal frame. The pivot of
the roof can be moved upwards by several inches, which creates 11
new angles—and changes the distance from the student to the media.
|
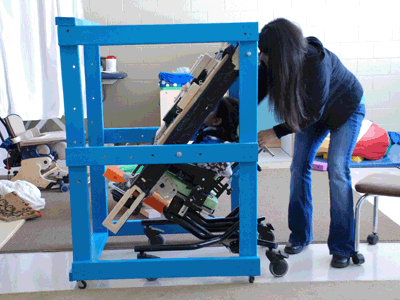 |
This is the 9th possible angle, with the
roof again resting on a bolt pressed through the horizontal frame.
The hole that allows for the 10th angle is visible to the
right of the bolt in the horizontal frame.
|
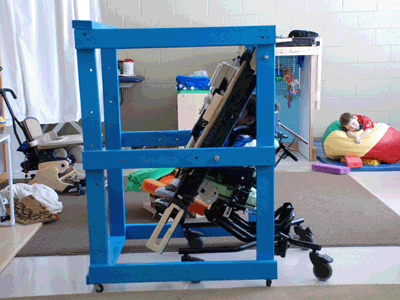 |
This is the 10th possible angle. The 11th
angle is perpendicular to the floor—with the roof extending straight
downward. When viewed one after the other it is easy to see how the
DIMC can present media options to a student at a variety of angles.
Also, the student’s position relative to the media option is also
clear. Both can be adjusted by the teacher to meet the needs of the
individual students. |
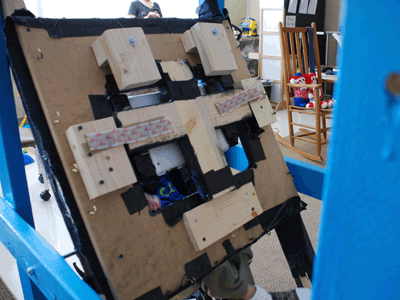 |
This is the top of the roof. The 2x4 (scrap) blocks
on the sides and bottom are screwed to the backside of the "roof" to
ensure a flat screen computer monitor can’t slide. The two blocks
visible above the monitor and iPAD holder are designed to hold a
computer monitor so it can’t fall backwards when the "roof" is
perpendicular to the floor. The blocks swivel so that gravity holds
them in place and they, in turn, hold the monitor, but can swivel
out of the way to allow for quick and easy removal or installation
of the monitor. The iPAD adaptor, visible in the center of the
opening where a monitor (or book, picture, map, etc) would go, was
likewise sized so as to hold it in place. The Velcro visible on the
backside of the "roof" is there for the iPAD holder—one student was
skilled at pushing the iPAD back and almost out of the window
entirely. |
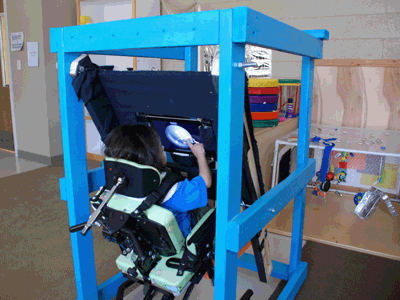 |
A student is able to access an iPAD at an angle that works for the
student. The distance from the student to the media is determined
visually but also physically—the student needs to be able to touch
this particular media option and must be within reach. Note the use
of black felt. It was discovered that a student could rub against
the painted wood, which could result in scraped hands. Felt was used
to provide a softer surface in the event of student contact. Black
was chosen for the roof of the DIMC because it allowed for good
contrast with most media, particularly computer monitors and iPADs.
(The rest of the DIMC is turquoise because that color happened to be
available in quantity.) |
 |
This is a close up shot of the previous picture. The
student is engaged in the activity and, due to the positioning in
the supportive chair, doesn’t have to expend energy attempting to
maintain posture or body position. Instead, the student is able to
focus on the task at hand.
|
|
|
|
|
|
|
|
|
|
|
Construction Technique: |
|
If you’re thinking that you can’t build one (It’s
probably about a 3 or a 4 on a 1-10 complexity scale) or don’t have the
tools, it is almost certain that you know someone who can make one for
you. A good shop teacher could likely crank one out for you in a couple
of prep periods.
The DIMC is built of commonly available materials:
-
2”x4” lumber
-
¾”x24”x24” plywood
-
About a pound of 2”
wood screws
-
Two ½”x5” bolts with
washers and nuts
-
Two 3/8”x5” bolts
with washers and wingnuts
-
Caster wheels
(optional, but really handy)
-
Paint (painting the
side of the roof the student sees black ensures good contrast for
computer monitor/iPAD applications)
-
Felt or cloth
(optional, but helps ensure student safety—a student rubbing against
the painted wood while trying to activate a switch can scrape the
skin on the hand)
All of the materials can be procured at home improvement
stores with the exception of the felt/cloth. The cost of building a DIMC
is roughly $50. The design, in broad strokes, is a box with a roof that
can be adjusted to present a variety of angles. The standard dimensions,
which can be changed to meet the needs of individual programs/students,
are 3’ long by 2’ wide by 4’ high. The construction of the DIMC is
straightforward. Four vertical posts, 4’ tall, are supported by six 3’
long horizontal pieces along the sides and three 2’ long (27”-30” allows
for more secure connections between the two sides of the DIMC)
horizontal pieces in the front and back which connect the two sides. The
‘roof’ is a pair of 40” long pieces to which a 24”x24” piece of ¾” thick
plywood is attached. Everything but the roof is attached with the 2”
screws. The roof is held in place via the ½”x5” (front of the DIMC—the
front end of the ‘roof’ is the pivot) and 3/8”x5” bolts (the back end of
the ‘roof’ is only part of the DIMC that moves—and is bolted into place
at whatever angle is appropriate). The top of the roof has a few
attachments to ensure the stability of the computer screen and iPAD.
Back to
NMSBVI Innovations Page
|


